

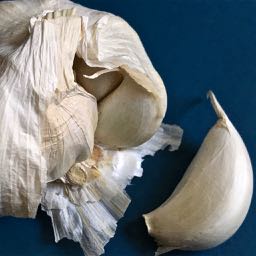
Softneck garlic bulb with one of its garlic cloves detached, ready for planting. (Photo: Helen Battersby)
Garlic is not only easy to grow, but also available in several varieties, which can be nurtured, then sampled like fine wine! In Ontario, garlic is typically planted in the fall and harvested the following summer. Spring planting is possible but will produce smaller bulbs.
Terms to know
- Hardneck garlic ( sativum var. ophioscorodon) is cold-hardy and the most common variety grown in Ontario. Hardnecks have a single row of cloves surrounding a hard central stalk. Varieties grown successfully in Ontario include Rocambole, Purple Stripe and Porcelain. There are several subvarieties. Hardneck garlic produces scapes (flower stalks). Hardneck varieties are recommended for the beginning garlic grower.
- Softneck garlic (Allium sativum sativum), is better suited to milder climates and is the type usually sold in supermarkets and braided into bundles. Softnecks typically have smaller and greater numbers of cloves surrounding a flexible central stalk. Varieties that have been grown in Ontario include Artichoke and Silverskin.
- A garlic bulb is made up of individual cloves arranged around the central stem. The number and size of the cloves will vary with each garlic variety.
- Scapes are the flower stalks of hardneck garlic. They are edible raw or cooked.
Selecting and planting garlic cloves
Garlic grows well in many spots in the garden – in raised beds, containers, among flowers or in perennial beds. Just make sure the roots have room to grow and are not crowded by neighbouring plants. Choose a site in full sun with fertile, well-draining soil and a neutral pH. Although garlic will grow well in many soil conditions, overly sandy soil, heavy clay soil and stony soil will be more challenging. Do not plant garlic in areas where water pools, as this can promote fungal infections. Before planting, prepare the soil by working in organic matter (e.g., compost or well-rotted manure) to a depth of 15 centimetres. If you’re planning to grow garlic in pots, larger containers (e.g., 150 litres) will better protect against freeze / thaw cycles. Smaller pots may need insulation from temperature changes.
Source garlic bulbs from a local grower or other reputable supplier, not the ones you would purchase to eat from the supermarket. Grocery store bulbs may have been sprayed with a chemical to prevent sprouting, and/or may not be suitable for growing in the Ontario climate.
Each garlic bulb contains several cloves. Just before planting, gently separate the individual cloves and plant only healthy, unblemished cloves with intact (papery) skins (use damaged or smaller cloves for cooking). Plant the cloves with pointed ends up, 13-15 centimetres apart and 7.5 centimetres deep. When planting cloves in rows, leave at least 20 centimetres between rows to make sure that the plants do not shade one another. Cloves planted on their sides or upside-down will grow, but the resulting bulbs may be misshapen.
Plant the cloves 4-6 weeks before the soil freezes in the fall, to give the roots time to establish before winter sets in; late October In the Greater Toronto Area. Mulch with at least 10-15 centimetres of chopped leaves or straw to minimize harm from freeze-thaw cycles over the winter. Each clove planted in the fall will yield a new bulb the following summer.
If your space allows, it is optimal to allow at least 4 years between planting any Allium species (e.g., garlic, chives, leek, onion, scallion, shallot) in the same spot to discourage buildup of pests or pathogens in the soil.
Spring tasks
In spring, remove most, but not all, of the mulch. Mulch helps minimize weeds and conserve soil moisture, but if it is too dense it could prevent garlic shoots from breaking through.
Keep the planting area weed-free, as weeds compete with the garlic for nutrients and space. Soil should be kept uniformly moist but not soggy. Less frequent but deep watering that delivers 2.5-5 centimetres a week is best.
If the soil is rich, there is no need to fertilize. If fertilizer is used, a first feeding of a high-nitrogen fertilizer (e.g., blood meal) is recommended early in the growing season. After this, any good vegetable fertilizer with higher phosphorus content can be used as needed.
Scapes
Scapes usually appear on the stalks of hardneck garlic varieties around the third week in June. Scapes divert energy away from the bulb, so most experts recommend they be snapped or cut off (anywhere from one-third to one-half from the top) once they start to curl. You can eat the scapes raw or use them in cooking. Others have found that leaving the scape on until the bulb is harvested, or at least until it has made 2 loops, yields large, healthy bulbs. Scapes left on garlic plants will bloom and attract bees.
Stop watering in July
From early to mid-July garlic plants stop producing new leaves and their bulbs start to swell. Remove any remaining mulch and stop watering and fertilizing. Allow the soil to dry out, as too much water at this time can promote disease in the harvested bulbs and later in storage.
Harvest the garlic crop
Depending on the variety, garlic should be ready to harvest in late July or early August. Harvest on a dry day when the tips of the lower half to two-thirds of the leaves have dried and turned brown for hardneck varieties (or with softnecks, when the plants have started to fall over).
Timing is important. Bulbs harvested too early will not have reached maximum size or flavour and will not store well. Bulbs harvested too late may have burst their skins and be vulnerable to rot. If there is any doubt, dig up a sample bulb and check to see if it is ready.
Loosen the soil with a fork or trowel and gently lift each bulb. Handle the bulbs gently, brushing off loose dirt and being careful to avoid making cuts or bruises that could allow entry of pathogens. Do not wash or break the bulbs apart. At this point, the skin layers are delicate and should not be rubbed clean before curing. Trim the roots to 0.6 centimetres and brush dirt from roots.
Hang the bulbs or lay them on a rack to air dry in a well-ventilated, cool, shady area, for 2-4 weeks. When completely dry, cut off the stems, leaving about 10 centimetres and store in a cool area out of direct sun where the temperature is above freezing and constant. Paper or mesh bags, egg cartons or cardboard boxes work well. Avoid plastic bags and don’t store garlic in the fridge. Cool temperature and low humidity are key to how long your garlic can be stored. Depending on the variety and under good conditions, garlic will keep up to 6, 8 and even 12 months.
Save some of the (best) bulbs to plant again the following fall!
Disease and pest control
To minimize diseases and pests, plant only clean, disease-free cloves, dig up and dispose of weak/diseased-looking garlic plants in the garbage (do not compost them). Rotating garlic to a different space in the garden each year is optimal to avoid pests and diseases that can linger in the soil. Diseases and pests that can afflict garlic in Ontario are discussed in Garlic production Factsheet – found at http://www.omafra.gov.on.ca/english/crops/facts/09-011w.htm
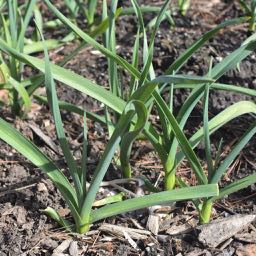
The spring leaves of garlic, growing through mulch in a weed-free garden bed. (Photo: Helen Battersby)
Additional useful resources
OMAFRA (2009). Garlic production Factsheet. Last reviewed March 2009. Retrieved from http://www.omafra.gov.on.ca/english/crops/facts/09-011w.htm
Garlic Growers of Ontario (2016). Growing garlic 101 – A garlic growers beginners reference guide. Retrieved from https://www.garlicgrowersofontario.com/how-to-grow-garlic
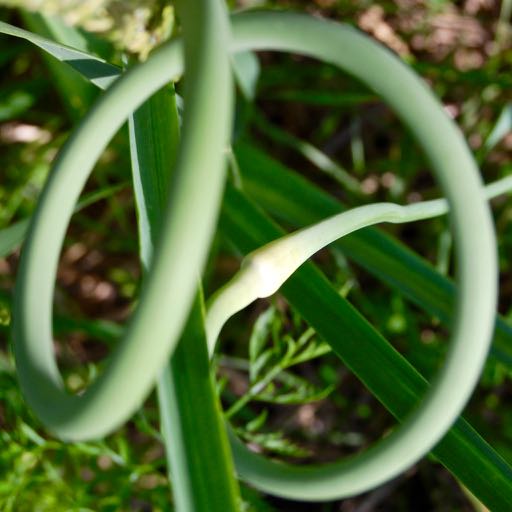
Garlic scapes are fun to watch as they curl. Young scapes are also delicious. (Photo: Helen Battersby)
Date revised: September 2021
Prepared by the Toronto Master Gardeners, these Gardening Guides provide introductory information on a variety of gardening topics. Toronto Master Gardeners are part of a large, international volunteer community committed to providing the public with horticultural information, education and inspiration. Our goal is to help Toronto residents use safe, effective, proven and sustainable horticultural practices to create gardens, landscapes and communities that are both vibrant and healthy.
Statement on Invasive Plants: When choosing plants, avoid invasive plants, which can spread quickly and dominate gardens. Invasive plants are sold by nurseries, big box stores or even at community plant sales. Invasives may already be present in your garden. They can invade gardens by spreading from under a neighbour’s fence or may be transported by wildlife. For beautiful, sustainable options to invasive plants, see the Ontario Invasive Plant Council’s “Grow Me Instead – Beautiful Non-Invasive Plants for your Garden” at https://www.ontarioinvasiveplants.ca/resources/grow-me-instead/ before purchasing or accepting “gifts” of plants.
Statement on Home Remedies: The Toronto Master Gardeners do not recommend home remedies, as these have not been proven effective through scientific investigation, and may even damage other living organisms in the soil or plants in your garden. There are other garden friendly options you can use.
If you have further gardening questions, reach us at our gardening advice line 416 397 1345 or by posting your question here in the Ask a Master Gardener section. To book Toronto Master Gardener volunteers for talks, demonstrations, advice clinics, or other services, please contact us at 416 397 1345 or bookamg@torontomastergardeners.ca