

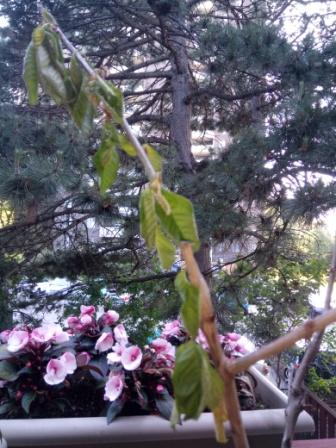
I bought a fairly well grown cherry plant from costco last year and inserted the pot that it came in into a larger pot. The larger pot is 18inches x18. This season, it did start sprouting leaves but then all leaves have started drying. Right now there is only one branch with leaves, which are also dying. Please tell me what should I do to revive the plant. if it helps, it is in the balcony and I have a large pine tree in the backyard. sunlight is not great but it is there for this plant.
My feeling is that your tree is more than likely “pot bound” as you have left it in the smaller nursery pot. Lift the smaller pot out of your larger pot and then carefully lift the tree out of that pot. If you see roots, roots & more roots, and very little soil, then you have a diagnosis, it’s pot bound. Below you will find a short list of requirements needed for successfully growing Cherry trees in containers.
- Best choice of Cherry tree to plant in a container is a dwarf sweet self pollinating variety.
- Container size needs to be fairly large in order to supply tree with sufficient moisture & nutrients (example – a 5ft tree needs a 15 gallon/57 litre pot).
- Container needs to have a drainage hole or several holes.
- Before filling your large pot, position it where it will receive the most daily sunlight as Cherries need as much sun as they can get.
- Also position the pot where it will get good air circulation as this will help prevent disease and encourage better fruit ripening.
- Use a commercial container potting soil.
- When planting, fill the pot half way with potting soil.
- Remove tree from nursery pot noting where the soil level was on the tree trunk. Then gently tease/loosen out the root ball, pruning any roots that are large or look damaged.
- Sit the tree into the pot and measure where the soil level will come to on the tree trunk if you fill the pot leaving 1-4 inches below the pot rim. Adjust by adding or subtracting the soil in the bottom. You do not want the final soil level to come up higher or be lower on the tree trunk that it was in the nursery pot.
- Once you have the soil level figured out, centre the tree in the pot and begin to fill with the rest of the soil. Gently tamp it down all around.
- Add a 1 inch layer of mulch over the top of the soil, keeping it away from the tree trunk bark.
- Water in well.
- Water tree thoroughly several times a week throughout the growing season.
- Fertilize in the spring when you see buds begin to swell. This can be done with an organic seaweed fertilizer or a fertilizer with a lower Nitrogen (N) number. If the tree does produce fruits, then fertilize once again directly after harvesting the cherries otherwise just feed it once.
- Many Dwarf Cherry trees take 4 years to flower and produce fruit so be patient.
- At maturity, these trees can reach somewhere between 5 – 10 foot in height.
Now that you’ve read the above, I hope you will be able to save your tree. If yours is not a dwarf variety, I would consider finding someone who has the space for it to be planted into the ground as it will continue to struggle even if you put it into a huge container.
Good luck.